In this activity, preschool kids get to chip away at bricks and stones with a hammer and chisel. It’ll leave them feeling powerful, trusted, and capable. It also builds hand-eye coordination, visual tracking skills, muscle control, muscle strength, and more.
Safety Fist
Sometime kid’s safety gear can be more of a hassle than it is worth–goggles can fog, gloves can mute the sense of touch, and hearing protection can keep kids from understanding important instructions. That said, these pieces of safety gear are 100% necessary for this activity. There will be small (and maybe not so small) bits of stone or concrete flying through the air, so protecting the child’s eyes is a must. The smash and noise of the hammer strikes also make gloves and hearing protection necessary. I also recommend you find an effective way to keep other children away from the action so they are not hit by flying debris.
What You’ll Need
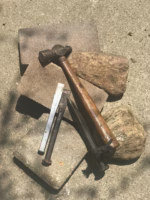
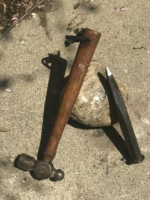
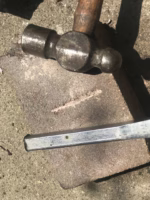
- A ball peen hammer—like this. They come in different weights and sizes. You’ll want one with a bit of heft that kids can still comfortably (and safely) handle.
- Bricks and/or stones–size matters. Don’t start with anything small than the size of an average brick–3.5 inches x 2.25 inches x 8 inches. Bricks will either be made of clay or concrete. Rock availability and type will differ from place to place. You’ll probably want to go with something quarried close to home since it will be much less expensive than importing rock from the other side of the country. Concrete pavers are probably the least expensive option in most areas, but local stone can be cheap too. Go as big as you like with the stones. If I was still running an early learning program, I’d haul a rock 2 or 3 foot across into a corner of the play space and designate it the Chipping Rock.
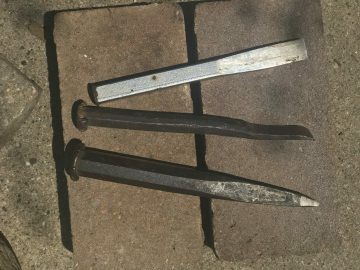
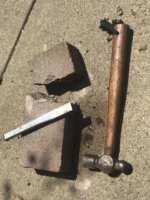
- A mason’s chisel—like this or like this. I’m an old guy with lots of old chisels I’ve inherited from older guys–they would work fine. What the chisels at the links offer that my old guy chisels do not is built in hand protection, which is a nice feature for kids who may not have a lot of experience hitting a chisel without hitting their hand.
- The above mentioned safety gear–here’s the stuff I purchased for my granddaughter: gloves, goggles, ear protection.
The Setup
There’s not much to it. Select a space–a patch of grass or slab of concrete is fine. The ideal space will be away from window, parked cars, and anything (or anyone) you want to avoid pelting with flying chunks. Also consider cleanup–the result of this activity could be a bunch of concrete or stone fragments that you may want to (or have to) clean up. Select a location that makes cleanup easy.
Hammer Time
The activity itself is pretty simple too. To get rolling, you’ll want to do some direct instruction:
- Help the child into their safety gear and explain why it’s necessary.
- Show kids how to hold the chisel with its cutting edge against the brick or rock with one hand.
- Demonstrate for children how to hold the hammer in the other hand.
- Show them how to strike the chisel head with the hammer. Explain that they should only hit the chisel when the other end is pressed against the brick or stone.
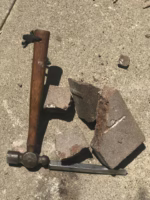
After explaining the process, step back and give the child a go. Don’t expect a lot of the flying debris I mentioned above. It turns out a fair amount of strength and a bit of aim are required to send chunks of stone flying through the air. Don’t worry though, activities like these are much more about the process than the finished product. Even if they are not creating a cloud of flying concrete chips, most kids enjoy the noise, being trusted with real tools, engaging in something that requires protective gear, and feelings of power and agency. Let interested kids take turns with the hammer and chisel, allowing each of them to chip until they are done. Most kids will run out of energy pretty quickly.
Learning
In the first paragraph I said this activity allowed kids to feel powerful, trusted, and capable as well as build their hand-eye coordination, visual tracking skills, muscle control, muscle strength, and more. Here’s some of the more:
- Children get to practice taking turns.
- Kids get to interact with new vocabulary (chisel, goggles, stone, concrete, etc)
- They learn about cause and effect relationships.
- They tune into their bodies (the vibration chisel strikes send through their arms, the fatigue their muscles feel after 50 hammer blows)
Be ready to follow kids where the activity takes them. For example, this activity may lead kids wanting to investigate things like:
- How concrete is made.
- Different types of rock.
- Different tools.
- Sculpture.
- How rock is quarried.
- How vibrations work.
- Machines used for breaking rocks.
Or, It may not–and that’s OK too.
Final Words About Safety
You may want to give this activity a try and meet some resistance when you enthusiastically share the idea with parents or coworkers. That’s to be expected, people tend to be wired to imagine and expect the worst. You envision happy children engaged with tools, they imagine a child driving a chisel through the back of their hand. In these cases, I recommend you take the time to complete a Benefit/Risk Assessment. Such an assessment helps you explain why the activity is valuable and shows that you’ve put some thought into how to minimize risk.
Conclusion
All though there is a bit of risk involved, this activity has much to offer when it comes to learning and development. As always, your questions, thoughts, concerns, and experiences are always welcome in the comment section below.
Contribute content to Playvolution HQ
Brought to you by Explorations Early Learning
Browse Trainings

Post Author

Jeff Johnson is an early learning trainer, podcaster, and author who founded Explorations Early Learning, Playvolution HQ, and Play Haven.
Leave a Reply